When an Analysis
and Processing step is processing an image, it can be
beneficial to create a search region. A step that uses a search
region will only consider what is in inside the region, and ignore
the rest of the image. This can speed up processing by eliminating
unnecessary work. Using a search region can also make a step more
robust, minimizing any unwanted noise that might make a target
difficult to find.
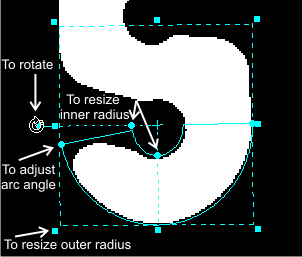
A search region can be a rectangle, elliptical arc, polygon, or
elliptical ring sector. Once a search region is created in a step,
other steps can use it as well. Note that not all steps can create
search regions; and those that can, are not necessarily able to
create all search region shapes.
You can define a search region interactively on the selected
step's displayed image, or by using the selected step's
Configuration pane.
To create a search region interactively on the displayed image,
click on the Define
a region ( ) toolbar button in the
Project toolbar, and then click on the image to define the
shape. The
Quick Access pane should give you information about how to
create the search region shape. Search region shapes can vary
depending on the step you are using.
Whenever you create or redefine a shape interactively, a
construction pop-up window will appear, as well as a yellow rubber
band that connects the shape to its fixture. Set the shape's
fixture (reference point and angle) in the construction pop-up
window by selecting a fixture from the list.
To edit or move an existing search region interactively, click
on its edge in the image. A bounding box will appear, allowing you
to resize and re-orient the image.
To use a search region defined in another step, click the
Use existing
shapes button in the selected step's
Configuration pane. Use the tree structure in the
Link editor to select the search region you want to use.
The shared search region will be updated automatically based on any
changes to the original.
You can specify the dimensions of a search region using explicit
values or expressions in the selected step's
Configuration pane. It is common to use expressions derived
from the dimensions of earlier steps to define a new shape. You can
drag and drop values from the
Quick Watch flyout panel of other annotations directly into
a dimension field of the shape that you are defining. You can also
write expressions for a shape's dimensions in the
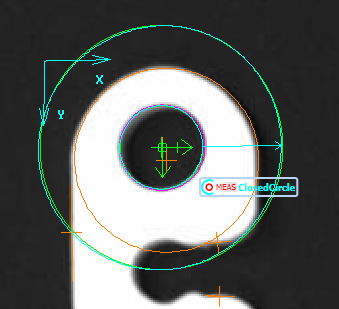
Link editor. Below is an example of a doughnut shape (an
elliptical ring sector) with an inner radius defined from the
radius of a previous step's annotation.
In some cases, when redefining a shape, if there are no
expressions involved, it might be quicker to delete the current
shape and draw a new one rather than editing its dimensions. To
select the entire image as your search region from your current
shape, click the Use
whole image ( ) toolbar button in the
Project toolbar.
If a step's search region or test region is calculated through
links or expressions, and the resulting search region falls
entirely outside the image boundaries, an error will occur. You
should make sure that none of your regions are out of range.


